
- 251
- 3 008 424
Will Gibbons | 3D Rendering
United States
Приєднався 2 жов 2011
Join me every Monday for free rendering and animation tutorials and occasional videos about freelancing, computers and more.
Free Project Files: www.willgibbons.com
Premium KeyShot Courses: courses.willgibbons.com
Render Fam community: discord.gg/3GJQn6NgXd
Free Project Files: www.willgibbons.com
Premium KeyShot Courses: courses.willgibbons.com
Render Fam community: discord.gg/3GJQn6NgXd
PROCEDURAL Machined metal in KeyShot!
Learn how to create a procedural machined metal texture in KeyShot the easy way!
Download the free project files here:
willgibbons.com/learn
Premium machined metal course:
courses.willgibbons.com/machined-metal
Time Stamps:
0:00 - Introduction
0:40 - Anisotropic angle explained
2:21 - Image-based approach
3:33 - Fully procedural approach
4:26 - Split object surfaces
5:10 - Build the material from scratch
7:43 - One last example
Переглядів: 3 174
Відео


Should Industrial Designers Learn Blender?
Переглядів 16 тис.Місяць тому
I'm answering the top questions I received about learning Blender for Industrial Designers. You can read more about my experience learning Blender and how I went about it here: www.willgibbons.com/learn-blender/ Time Stamps: 0:00 - Introduction 0:37 - 1. Should industrial designers learn Blender? 2:18 - 2. How do you work with CAD in Blender? 5:07 - 3. When is Blender useful for industrial desi...
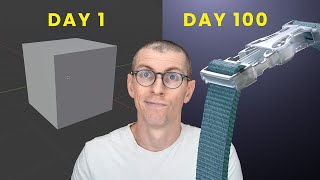
I Spent 100 Days Learning Blender
Переглядів 134 тис.2 місяці тому
Here's why and how I spent 100 days learning Blender as a designer who normally uses CAD and KeyShot for modeling and rendering. I share my exact process so you can learn Blender on your own without quitting! Read the full article on this topic here: www.willgibbons.com/learn-blender/ Time Stamps: 0:00 - Introduction 0:22 - My existing tools 0:41 - What is Blender? 1:22 - Why I learned Blender ...

More Realistic Color in KeyShot with ACES
Переглядів 3,3 тис.5 місяців тому
More Realistic Color in KeyShot with ACES


Tom Dixon Lamp Reimagined with Fusion 360 and KeyShot
Переглядів 3,2 тис.7 місяців тому
Tom Dixon Lamp Reimagined with Fusion 360 and KeyShot

Rendering Jewelry in KeyShot - Full Process
Переглядів 20 тис.7 місяців тому
Rendering Jewelry in KeyShot - Full Process

KeyShot Animated Wireframe Tutorial
Переглядів 3,9 тис.7 місяців тому
KeyShot Animated Wireframe Tutorial

KeyShot Spot Light / Accent Light Tutorial
Переглядів 9 тис.9 місяців тому
KeyShot Spot Light / Accent Light Tutorial
KeyShot Center-On Modes Explained
Переглядів 2,5 тис.10 місяців тому
KeyShot Center-On Modes Explained
How to Render Chrome Metal in KeyShot
Переглядів 7 тис.10 місяців тому
How to Render Chrome Metal in KeyShot
How to Animate a Blinking LED in KeyShot
Переглядів 12 тис.10 місяців тому
How to Animate a Blinking LED in KeyShot
Labels in KeyShot - everything you need to know!
Переглядів 7 тис.11 місяців тому
Labels in KeyShot - everything you need to know!
PBR Textures in KeyShot the RIGHT Way
Переглядів 8 тис.11 місяців тому
PBR Textures in KeyShot the RIGHT Way
Render Artist Critiques Your Renderings Vol. 4
Переглядів 3 тис.11 місяців тому
Render Artist Critiques Your Renderings Vol. 4
Nylon Webbing Material KeyShot Tutorial
Переглядів 8 тис.Рік тому
Nylon Webbing Material KeyShot Tutorial
KeyShot Color to Number Tutorial - Free Course Lesson
Переглядів 2,2 тис.Рік тому
KeyShot Color to Number Tutorial - Free Course Lesson
Using Colors as Numbers in KeyShot Material Graph
Переглядів 1,1 тис.Рік тому
Using Colors as Numbers in KeyShot Material Graph
Injection Molding Plastic Part Line KeyShot Tutorial
Переглядів 6 тис.Рік тому
Injection Molding Plastic Part Line KeyShot Tutorial
Intro to Material Graph UI - KeyShot Material Masterclass Excerpt
Переглядів 3,3 тис.Рік тому
Intro to Material Graph UI - KeyShot Material Masterclass Excerpt
Fix Shadow & Reflection From Label on Glass Bottle in KeyShot
Переглядів 4,9 тис.Рік тому
Fix Shadow & Reflection From Label on Glass Bottle in KeyShot
The Difference Between All KeyShot Material Types
Переглядів 1,5 тис.Рік тому
The Difference Between All KeyShot Material Types
The KeyShot Material Masterclass is Here!
Переглядів 3,2 тис.Рік тому
The KeyShot Material Masterclass is Here!
KeyShot 2023, Worth the Upgrade? First Look & New Features
Переглядів 24 тис.Рік тому
KeyShot 2023, Worth the Upgrade? First Look & New Features
Realistic brushed brass door handle with knurling KeyShot rendering tutorial
Переглядів 17 тис.Рік тому
Realistic brushed brass door handle with knurling KeyShot rendering tutorial
Make a Glowing Light Pipe Material in KeyShot
Переглядів 14 тис.Рік тому
Make a Glowing Light Pipe Material in KeyShot
Lock Camera to Moving Object in KeyShot
Переглядів 9 тис.Рік тому
Lock Camera to Moving Object in KeyShot
Rendering Transparent Objects in KeyShot
Переглядів 9 тис.Рік тому
Rendering Transparent Objects in KeyShot
How to make SEAMLESS KeyShot materials
Переглядів 8 тис.Рік тому
How to make SEAMLESS KeyShot materials
thank you for sharing😊
Perfect guide, I'm sturggling with same situation nearly years. thank you.
Thank you for the video, and could you tell me what is the mouse you are using and is it good for a CAD user rather than Blender?
No real information here... just another commercial
Robby is a great teacher.
Hello, is it possible to make a similar animation in Keyshot 10.2 pro? I cannot load your material, I have information about a newer version. Maybe you could save this material in version 10.2?
You could try recreating it in 10.2, but I don't have access to older versions of KeyShot.
This is awesome except I wish you had linked the tutorials you used. I found CG Fast Track but $800 is bit much to investigate software you're not even sure you want to use. Great job though! Love the progress.
After working through the beginner course they offer for free on UA-cam, I felt confident it was worth the investment. Also, I paid around $300 because upon downloading their project files, they emailed me a promotion that offer the big discount for about a week. I think this is the standard flow for their customer acquisition. But I understand that $800 would be quite a lot for just investigating the software as you mentioned.
ruffwear collar looks sick!
Cad can be used for games too however it needs retopology the difference between cad and something like blender is how objects are modeled
Perfect animation and sound!
Thank you!!
Well done for your dedication and thanks for the video. What you have achieved looks amazing.
Thank you very much!
I don't see the cheat sheet anywhere? :(
It's in the file vault, along with all the other project files. You just need to scroll down a bit.
@@WillGibbons ah! I browsed the file vault a couple of times and just couldn't see it before I used search :) cheers!
Each time Blender becomes more and more complex, which was already the most difficult program to learn among polygonal programs. If you studied Cinema 4D, it would take three times less time and effort to complete all your projects. Even 3DS MAX, despite its complexity, is much easier to learn than Blender. Yes, I switched from C4D to Blender, but only for the sake of modeling and rendering, everything else in blender is done simply badly and not logically, but people use it for only one reason - it is completely free. But this transition was just a nightmare for me.
Interesting. I spent a month learning C4D in the past and over a year learning MODO back in the day. I didn't find Blender to be too difficult. And now, it's much better than it was 6-7 years ago.
wow you are a legend, so cool!
That's exactly my problem. I am used to CAD and Solid Edge, and I am only in my second week and learning slowly.
Slow and steady wins the race! You've got this!
03:26 you did not tell us how to add this point light. I searched everywhere but could not find anything
Edit>Add Light>Point Light.
Awesome tutorial Will! It's the best one I've seen on jewelry rendering! There's an annoying thing that happens when I activate "Product" mode in the lighting presets: The area under the stones gets orange, even that all the other presets are the same as yours. Do you know why that happens and how to solve it? Thanks in advance!
I think this is because of the global illumination. You can try disabling that or reducing the GI bounces.
Wonderful teaching video, ❣❣❣learned a lot. ❤🔥I am a beginner and a college student majoring in industrial design. I am quite beginner in using keyshot to render, and I would like to ask if it is our use of HDMI lighting. Is it just a relatively fast imaging method? If you really want to achieve very good lighting effects, you still need to use physical lighting. Is that so?
It just depends on your specific needs. HDRIs will render faster in most cases. They're also easy to use since you're mostly just rotating them. Physical lights require you to dial in a bit more control and position them manually. This can be more time consuming and confusing to a beginner. But they'll generally give you more control.
Hi what keyboard do you use?
Iqunix F96!
Yep, I have the same problem - hard-core CAD background (Solidworks and for 4 years, Alibre) but making explanation animation is a missing skill set.
Very great video. Also good advice on how to approach learning a new program. Hope to learn blender myself soon to get into 3D modeling for advertising
I do recommend it! Thanks.
Such a good series, learned so many new things! Appreciate the breakdown of fireflies and how they occur. I was playing around with settings and not really understanding how they occur, so this was a big help!
Awesome! I know it's not the prettiest interior, but glad to hear you found some good insights.
Thanks for sharing your progress! I want to do the same.
You should!
I work for a company that designs and manufactures fixtures for retail stores. We work on a wide range of projects, from creating simple fixtures to designing complex retail environments for our clients. I work in the design department. We are in charge of creating all the concepts and environments for our clients. Once the design gets approved, the drawings that we make from the models go to a team in China that then uses the drawings to generate the final CAD models of the fixtures and send them to production. When they hired me, I was using SolidWorks as the main modeling and even rendering tool. Over time, they let me use Blender as a test and it was a game changer (I am bias with blender because I've been using it for my personal projects for over 15 years). I can now create models on the fly and render them very fast using cycles. It has been at least one and a half years since I made the switch and you couldn't convince me in any way to go back to SolidWorks. I understand that for actual manufacturing and production, a CAD program is better; however, if your job is strictly conceptual, I would suggest using a program like Blender for its flexibility and easiness to make changes on the models on the fly. Oh and I am also able to easily bring models from SolidWorks and Sketchup into Blender and work with them. It's all about creating a good workflow that satisfies the demands of the job.
Really enjoyed this one! The photoshop tips at the end were an added bonus
Cheers!
Bro share what were your goals, what did you want to learn?
The goal was to learn how to do 3D modeling, and some basic material and animation skills. I wanted to lay a foundation to build upon so I could do things that I could not accomplish using CAD and KeyShot alone.
Amazing work, how did you import pcb in keyshot including signal or track layer.
Just the same I would with any 3D model. I created this PCB model in Autodesk Fusion.
Super nice tutorial, man. This information si gold made knowledge, congrats.
Thank you. Knowing what to do with the lighting is a big part of rendering!
Really enjoyed the depth you go into here and also your thought process when tweaking and editing the features of the material. I'm just getting comfortable in Keyshot and these tutorials have been some of my all time favorites to follow along to on UA-cam, so thank you!!
Thank you so much! Glad you're finding them useful.
Im 20 seconds in and you are speaking to me at a very deep level. I feel personally attacked.
Achievement Unlocked! lol. Hopefully this is helpful and not discouraging.
its not worth putting any input into learning graphi design, heard alot of peaople losing their jobs to KI doing a better job way cheaper....
You're entitled to your opinion.
@@WillGibbons not my opinion its what ive seen in many cases...and with time KI gets better and will obviously replace more jobs, even mine...
Love the content
Thank you. This video was a bit of a labor of love. Maybe a bit niche for the KS community, but I enjoyed it.
good insights and inspiring process
I really appreciate it!
Super helpful tutorial! Going on day 3/30 and I have to say its already getting much faster to work through them :)
That's awesome! Keep at it. Most people underestimate how much they'll improve with a bit of daily practice.
Its amazing how much skills carry over across different tools. Color me impressed.
For sure. I think it's an easy trap to assume each software is super different. The UI changes, but the underlying function, logic and design skills carry over most of the time.
* holds up _Light for Visual Artists_ * * book title rendered illegible from blown out white light * 😂 nice quick fix tho 😉
Well done man! Awesome job, great progress
That's nice of you. Thanks!
Do you recommend quoting an hourly rate rather than giving a package price? I have found that freelancing fulltime means not only do you need to do the actual work but you also need to be your own manager and marketer. And those two additional skills that not all people will be good at.
I never charge hourly. I know plenty of people disagree with me there, but for a number of reasons, I've found project-based pricing to be the most ideal scenario.
how to set the initial position of Camera -> Path -> Position? As it does Fit To Zoom like starting point which is unable to delete that point. For example, I want to start position with Zoom out (object should be far away) and Zoom In progressively. I am unable to do that with Camera animation using Path because it FORCES the first position which Keyshot decided, rather than user.
You should be able to edit your camera path animation in the geometry view. Right click on the first control point and choose 'edit' and use the handles to drag it to a new position. Or, create a new camera and place it in the starting position you'd like. Then create a new camera path animation using this camera.
Hey can you tell where we can get your gold and diamond material setup?
Did you follow the link in the description for the file vault? That's where you can get all project files.
But who do you get the motivation for doing this. I dont even care learning Blender
I have no aspirations to do a lot of things. But my livelihood is teaching designers product visualization, so that's my motivation... plus, I love learning.
Besides the stupid price of Solid Works......other than that, it's pretty useful for the hobbist.
For sure!
How long did your render take to process at 20k samples? I've never rendered anything near that high, so it makes me think I'm doing something wrong, even ~100 sample renders seem to take hours per image/frame. I've got a very capable custom desktop and laptop, and have tried on both, along with plenty of lighted/mixed transparency products at work. Still get a lot of fireflies, and transparent renders just take way too long to be able to realistically render out a long animation. Any tips on maximizing quality while minimizing render time?
Honestly, I can't recall. I was rendering on a fairly powerful GPU. GPU rendering in KeyShot yields many more samples per second than CPU rendering, thus your sample count ends up being substantially higher (by a factor of 3-10 in many cases).
how did you get inspiration to make your own mini projects and how you know it test the skills you have learned ?
Mostly intuition and looking around the house for objects I had on hand to reference. Most of them turned out to be more difficult than expected, so keep those mini-projects conservative and simple to start!
Hello,Will,can you teach us about beech wood meterials,i want to do the wood style ,but i can't do it well .
Wood is tricky. I still think the best approach is to check my procedural wood tutorial unless you have high-quality image textures to use.
Nice training video. Just a correction at minute 10.04, you state the clean out holes are for light to enter; however, this is incorrect (as the ring is against the finger, no light comes through.) The holes under the gemstones are for cleaning the stones. During repairs, heat is used to repair (traditionally, a torch) and the heat will burn the "dirt" to the gemstones making them dull and lifeless. It is imperative to have incredibly clean metal and gemstones during a repair - hence, the "clean out" holes.
Thanks for sharing! When I mentioned light penetration, I was thinking more of what's required in the rendering process, more so than IRL. But from a practical standpoint, what you said makes complete sense.
Yeah, this isn't a normal "how to" video, or even "do what I did"...
Is that good or bad?
nice one thank you it helped gaining more knowledge feeling like i make small steps to understanding Keyshot more even if its almost 2am
Glad it helped!
100 days of blender and you didn’t make a donut!! Tut tut!!
Nope.